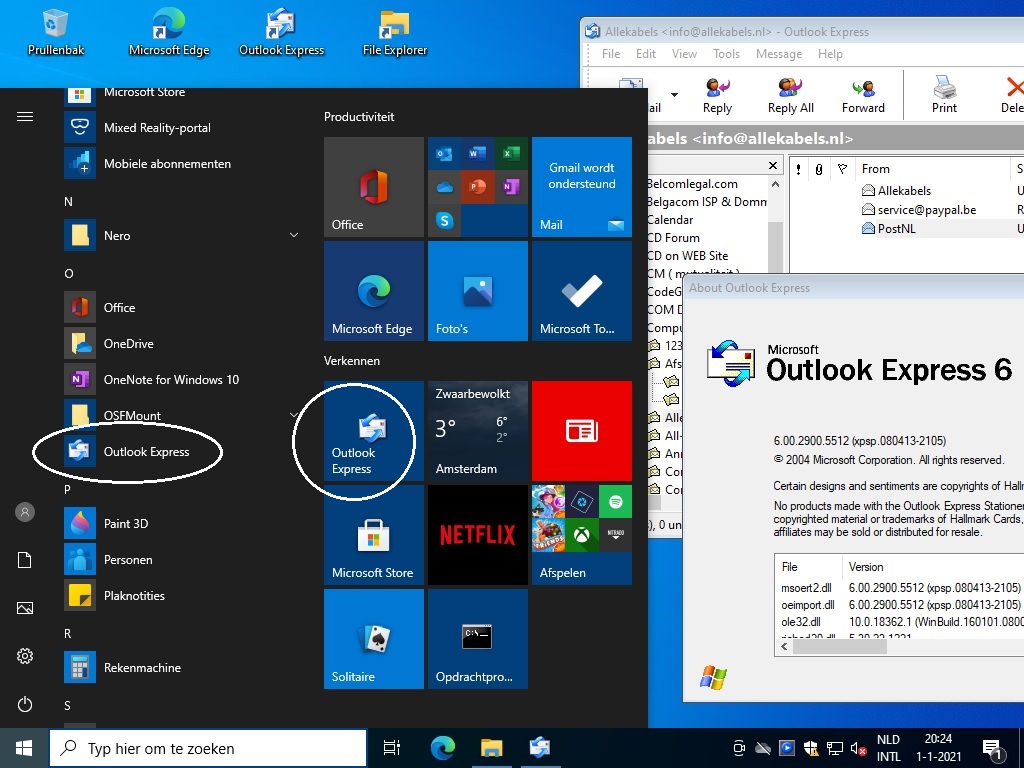
Contrary to the RunAsXp version, Windows 10 does NOT uninstall Outlook Express after an update ( a KBxxxxx cumulative update ) when using my installer.
WARNING ! Windows 11 did remove the "Identities" and the "Internet Account Manager" Registry keys during its upgrade to version 22H2 ! And once again , Windows 11 did remove Outlook Express completely during its upgrade to version 24H2 ! It is still important to save the Outlook Express data as described at Hints, tips and trivia .... topic (10) How to protect your OE installation against removal and how to restore it ( Summary )
Preface ....
Outlook Express excels by its simplicity, ease of use and runtime speed. Personally, I do not need more features than what OE offers me. During the past 10 years I created a huge complex tree of folders and subfolders in the left pane resulting in more than 8000 *.dbx files ( 9,75 GB in total ). I wonder if I could ever import this into another email client without lost of the tree structure and/or emails. ."OE Classic" did the job but the result was abominable with a bunch of entries that could not be stored as subfolder. The old Mozilla Thunderbird version 17.0.9esr enables you to select to import Outlook Express mail , but it did not succeed to read my huge tree.
You may watch this
desktop capture video about the bunch of local folders and how fast they open and close.
I paid in 2019 for the version from "http://www.RunAsXp.com". Because I could not accept that I had to reinstall the RunAsXp version after each Win 10 update or upgrade, I kept using XP to send and receive emails till I had no other choice than to migrate to Windows 10. I managed to build my own OE installer. Outlook Express runs now on my Windows 10 PC and Windows 11 laptop. All *.dbx files are now stored on my Windows 10 PC and I can still access them via my home network from my Windows 11 laptop and even from my old desktop PC with XP as installed OS.
Since
http://www.RunAsXp.com remains unavailable , I provide my installer for free to users who can prove they paid for the OE installer from RunAsXp. This installer is a stripped off version, based on XP SP3 Outlook Express file versions and installs within one minute, does not require a registration key and does not require a reboot. The installer simply creates and stores all necessary files into the
C:\Program Files (x86)\Outlook Express folder and enters Outlook Express specific key values into the Registry. Due to this rudimentary procedure,
Windows 10/11 must be 64bit and installed on the C:\ drive.
People that did not pay for RunAsXp , but wish to use Outlook Express again or as new email client program , may contact me for an alternative solution or may support the work I did by means of a donation. Despite its age , Outlook Express has a lot of benefits compared to other modern email clients among them its speed and the easy manageable and compact "Local Folders" tree view. I love the way one can just move folders/subfolders by dragging them into/under other ones.
Introduction ....
Outlook Express was developed when the ActiveX control was highlighted by Microsoft as cutting edge technology. This no longer appears to be the case. A well-written 32-bit app works fine on Windows 10, but Outlook Express doesn't, probably also because some Windows features aren't made backward compatible. Therefore, a "Microsoft Detours" hook had to be implemented to relaunch Outlook Express ( see
https://www.microsoft.com/en-us/research/project/detours/ ). The hook is implemented in "oehook.dll" and must be added to the pool of standard Outlook Express binaries. This same "oehook.dll" is also used in the RunAsXp version. When implementing a "Detours Hook", the Microsoft "detoured.dll" file must be presented within the pool of the other Outlook Express binaries as well. Some information on all of this can be found here too:
https://sites.google.com/site/simpledotnet/outlook-express-6. After all, Outlook Express has become "crap". Despite the hook, some functions still do not work in XP SP3 compatibility mode and work in Win10 or Vista mode, but others work in XP SP3 mode and stop working in Win10 / Vista mode. ..
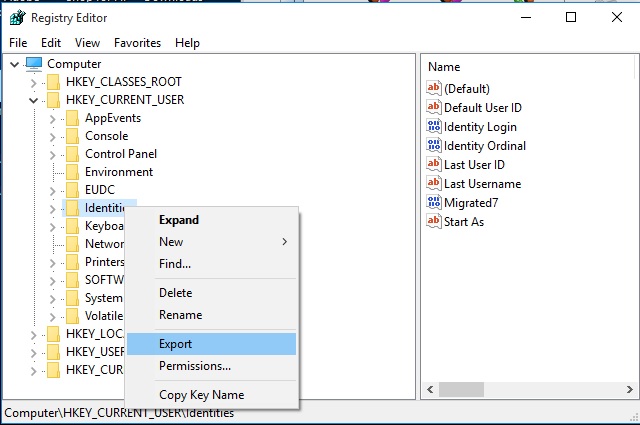
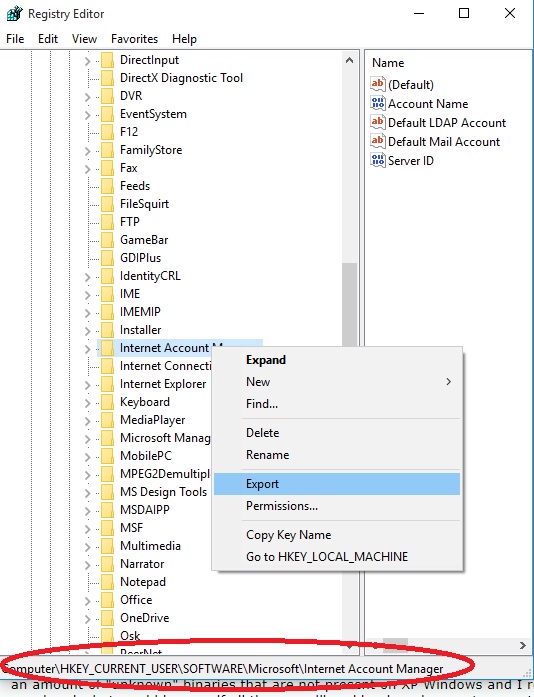
A forced or accidentally removed Outlook Express causes no pain if taking some precautions, such as saving settings and accounts. Settings and Accounts can be found in the Registry at respectively
HKEY_CURRENT_USER\Identities and
HKEY_CURRENT_USER\SOFTWARE\Microsoft\Internet Account Manager and should be saved ( exported ) by means of
Regedit.exe before starting the upgrade. It is a good practice to save these keys anyway as per regular backup. These registry keys can be entered again before the re-installation using my installer. Also, export the addressbook on a regular basis and keep the resulting *.wab file as backup. You are then able to import the addressbook at any time.
After installing, Outlook Express may be reconfigured to use an existing or a new Message Store Folder by running Outlook Express in
Vista compatibility mode ! It is a good practice to place the
"\Outlook Express" Message Store Folder with its *dbx files into the
C:\My Documents folder or into the
C:\ root instead of somewhere deep within the
C:\Users folder. This is more convenient since you can easily look into that folder without navigating deep into the
C:\Users folder. Pay attention : create the folder where you want to store the *.dbx files before you want to copy/move them. Outlook Express will not be able to create a new folder/subfolder.
Outlook Express creates per default a "Main Identity" with a new unique class ID when launched for the first time and this may cause some problems when afterwards entering your saved "Identities" and "Internet Account Manager" registry entries. The result will be two identities with the same name and OE always selects the one that it created per default. To avoid this problem, you should rename the identity that you actually use, for example into "My Identity", via "Manage Identities..." and before you save the "Identities" and "Internet Account Manager" registry keys. If you accidentally started a reinstalled OE before you entered the saved registry keys, you will be able to select between "Main Identity" and "My Identity" via "Manage Identities..." and configure to use "My Identity" at startup of OE.
How I crawled the data to create the installer ....
Being tired of having to reinstall Outlook Express with the registration procedure, and because I also dislike programs that automatically start a boot time, I started to investigate...... The RunAsXp installer adds an amount of "unknown" binaries that are not present on XP Windows and I realized that the author created these programs to work around some problems such as changing the store folder and others. So, I wondered what would happen if all those auxiliary binaries where not present in the
C:\Program Files (x86)\Outlook Express folder .....
I took a fresh clean hard disk, mounted it into my test PC and installed a fresh Windows 10 on it. When up and running, I exported all Registry hives ( HKEY_CLASSES_ROOT , HKEY_CURRENT_USER , HKEY_LOCAL_MACHINE , HKEY_USERS , HKEY_CURRENT_CONFIG ) by means of
Regedit.exe and saved them. Then, I installed the RunAsXp version,
but did not start it up ! Since it was my idea that running Outlook Express is just a matter of entering the correct Registry entries, I exported all Registry hives again.
The exported registry hives ( *.reg ) are simple text files and can easily be compared with each other, so, I compared the Registry hives from before the RunAsXP installation and from thereafter with each other. There exists programs that allow to compare and do highlight the differences, but copying and pasting these differences into another text file was a rather annoying pastime. Next, I filtered and deleted all differences that looked to me as RunAsXp specific, and I especially removed all references to what looks as "installer" and "uninstaller" keys. The idea behind this was that Windows 10 would not be able to detect that Outlook Express was installed. The final result were three registry
*.reg files which I named
HKCR - filtered.reg ,
HKCU - filtered.reg and
HKLM - filtered.reg. The HKEY_USERS and HKEY_CURRENT_CONFIG hives did not contain relevant Outlook Express information, so there was no need to create a "filtered" *reg file from those ones.
Once again, I reformatted the hard disk ( on another test system ) and started all over again with installing a fresh Windows 10 version on it. Now , it's time to enter the "filtered" keys by means of
Regedit.exe. Disappointment ! Most of the keys were successfully entered, but others did not due to lack of permissions. When looking into details, the keys where new values were to be added, are owned by "TrustedInstaller" and not accessible to "Administrators". To be able to enter the keys, one has to "take ownership" of the key and give "Administrators" full control to it. This is not a friendly behavior, but there is no other way around. When searching for help, one can find the well known command line
SetACL.exe utility from Helge Klein (
https://helgeklein.com/setacl/documentation/command-line-version-setacl-exe/ ) which allows to get ownership of registry keys and to change the permissions for Administrators. And indeed, I had to create a CMD ( *.BAT) file with calls to SetACL.exe for each registry key that I wish to add, once again a very annoying pastime.
After changing the ownership and the permissions on the keys, the "filtered" registry key hives could successfully be entered. Up to the next step which is creating the
C:\Program Files (x86)\Outlook Express folder and copying all collected ( previously saved ) files from the RunAsXp installation into the Outlook Express folder. Count down with a heartbeat : I clicked on msimn.exe and
Hurray ! , Outlook Express pops up !
After deleting all RunAsXp specific files and replacing the remaining files with XP Service Pack 3 files, one problem remains : the "
hook ". Either "msimn.exe" or another binary must load "oehook.dll", and to achieve this, the binary must be "patched" by means of
SetDLL.exe. That SetDLL.exe is a Microsoft tool from their "Detours" development package, including the program source code of the executable. The author of RunAsXp changed "msoert2.dll" to load "oehook.dll", but I prefer to patch "msimn.exe" as described at
https://sites.google.com/site/simpledotnet/outlook-express-6 (*). Apart from the Outlook Express Microsoft binaries, , "oehook.dll" and the Microsoft "detoured.dll" , I added
MailView.exe. Mailview.exe is free tool from
http://www.mitec.cz/mailview.html. You can open a single *dbx Outlook Express database file and select/save/view the emails within the *.dbx database file. I also included a "msimncopy.exe" , which is a pure copy of msimn.exe ( more about this further on ). Finally, the content of the
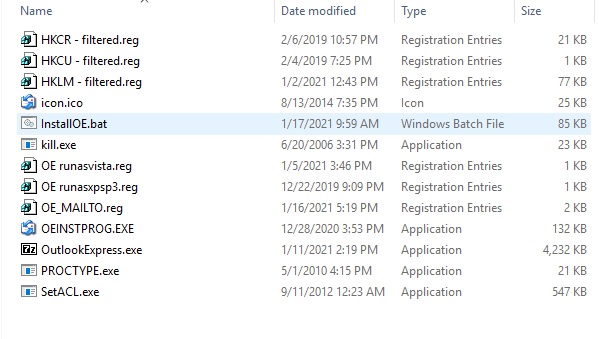
C:\Program Files (x86)\Outlook Express folder as shown in
Picture 1 remain as necessary, but nothing else, and thus no binaries in any other folder on the PC or Laptop...
(*) The site seems to be down. You may download a screenshot print out of its content here
WiCKY_Hu.7z
Picture 1
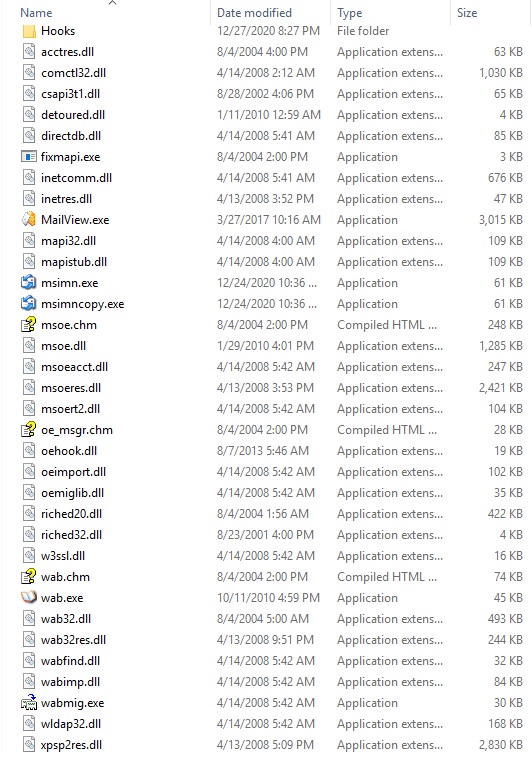
The "
\Hooks " folder contains the original non hooked binaries and the hooked binaries. They are not used and I provide them as documentation. Only in case someone wishes to use another language version of Outlook Express, the hooked "msoert2.SP3.hooked.dll" will have to be used. Read further in for details about how to run other language versions.
Putting all pieces together into an installer ....
I let "msimn.exe" run in XP SP3 compatibility mode, and the "msimncopy.exe" in Vista compatibility mode. The settings can be configured when selecting the binary "Properties" and afterwards selecting "Compatibility". The "OE runasxpsp3.reg" and "OE runasvista.reg" registry files do set these properties without navigating. The Windows LTSC versions do not come with an mail program, and when you click then on an email address within a web page, the OS pops up with the message "you need an app .... ". To let you select to use an email client, I added "OE_MAILTO.reg".
As mentioned before, I created a CMD file (
InstallOE.bat ) to take ownership and to set administrative rights on all registry keys that need to be entered. The next step is to add
Regedit.exe commands for these *.reg files into that command file with syntax "
Regedit /s registryfile.reg" for example
Regedit /s "HKLM - filtered.reg". The Outlook Express binaries from
Figure 1 are packed into a selfextracting compressed 7-Zip file
"OutlookExpress.exe". When you click on this selfextracting executable, it will prompt for a destination folder. The beauty about is that you can run the selfextracter from with a CMD file and that you can add the destination folder at the command line.
As final result, when running the CMD file ( As Administrator ) the installation completes with expanding the OE binaries into "C:\Program Files (x86)\Outlook Express" , setting access rights by means of SetACL.exe and entering the OE specific registry keys. This is however not very user friendly. The DOS command box pops up with all calls to SetACL.exe and even pops up the Regedit.exe calls to ask for an acknowledgment. All this can be suppressed by converting the InstallOE.bat into an installer executable. The
bat-to-exe converter ( old fashion version 1.6 ) from Fatih Kodak (
https://f2ko.de/programme/bat-to-exe-converter/ ) perfectly fits the task. The problem however is that the installer does not bring any output when running. So, I added three little programs that are called within the InstallOE.bat. The first one is "PROCTYPE.exe" that checks if the installer is running on the 64bit Windows version. If not, the installation aborts. The second one is "OEINSTPROG.EXE" which does "nothing" apart from popping up the "Installation in progress" window. This program has no button to stop running, it must be "killed" by either Task Manager, or by means of the "kill.exe" program. This "kill.exe" is a Microsoft program from their old resource kit, also provided with source code within their development kits. There is nothing mysterious about PROCTYPE.exe and OEINSTPROG.exe. The source code of them can be found here :
ProjectSources.7z
Finally,
Picture 2 shows the files that are used within the installer. The
bat-to-exe converter will expand these files during installation and will run
InstallOE.bat.
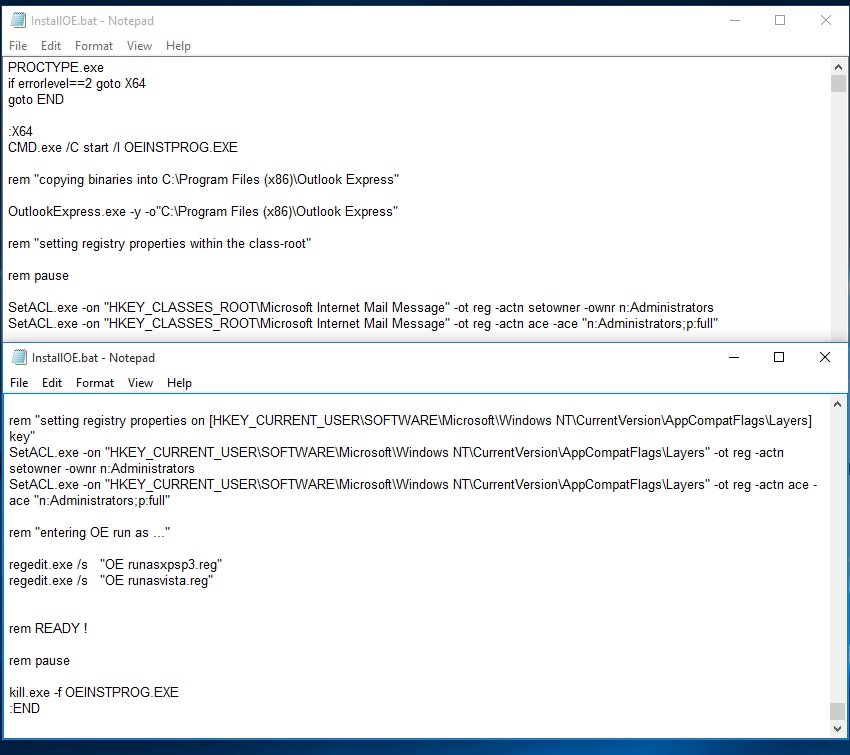
Picture 3 shows parts of
InstallOE.bat, i.e. the top lines and the bottom lines.
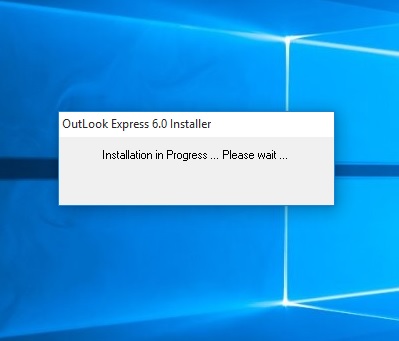
Picture 4 shows the window created by
OEINSTPROG.exe that pops up during the installation. Look at
Picture 3 to see when this program is started and when it is "killed" within the run of
InstallOE.bat. The
bat-to-exe converter will delete all files shown in
Picture 2 when the installation completes ( thus, when
InstallOE.bat returns ). If you want to keep these expanded files for investigation, just "kill" the run of the installer by means of Task Manager when the "Installer in progress ..." window pops up. Running
InstallOE.bat afterwards from within a CMD box "as Administrator" will install Outlook Express as well.
Picture 2
Picture 3
Picture 4
Creating the installer ....
Creating the installer via the GUI of
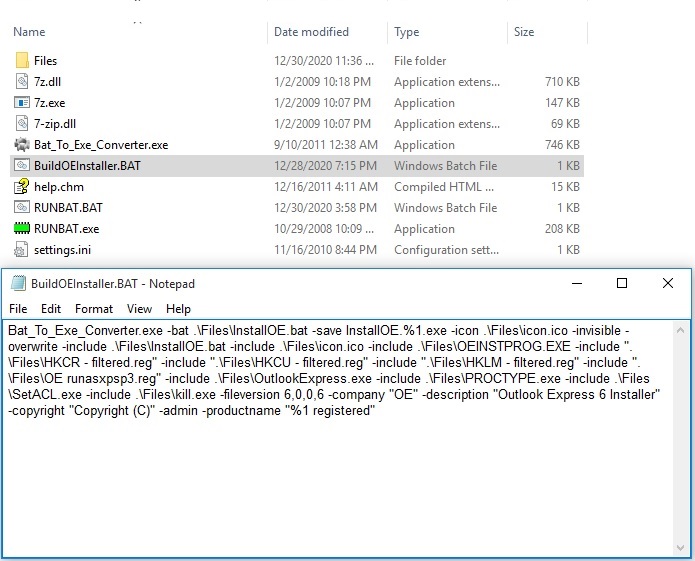
bat-to-exe converter is rather easy and straightforward, but starting it up several times during the development phase and entering the same values may become annoying. So, I created a CMD file "
BuildOEInstaller.BAT" that calls "
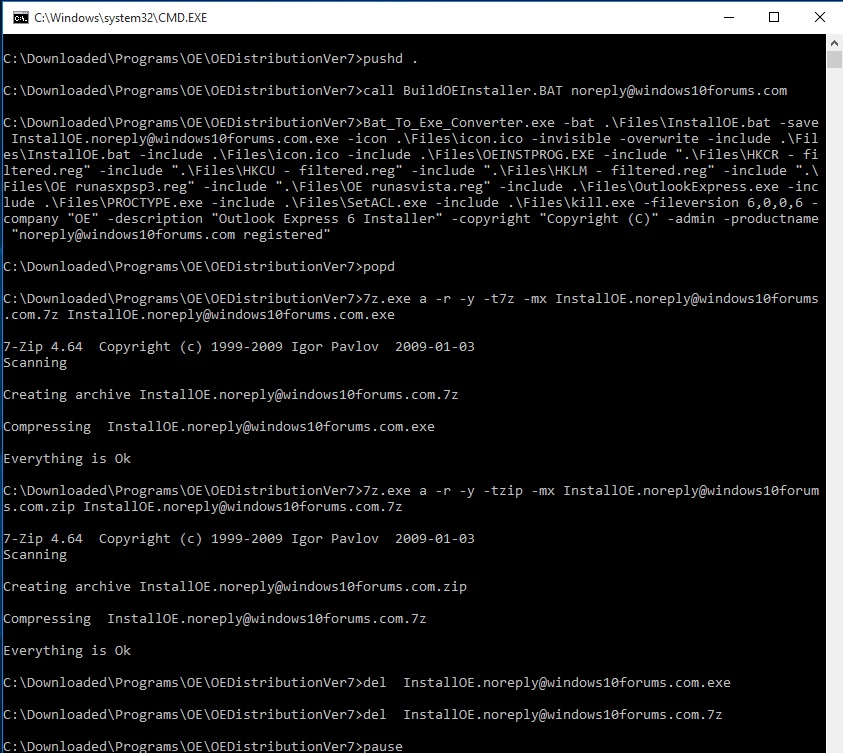
Bat_To_Exe_Converter.exe" with command line parameters. The result is shown in the second part of
Picture 5. The installer takes the files out of the "
Files" folder to build the package. This
Files folder contains the files shown in
Picture 2
Then came the idea to personalize the installer. The CMD file that calls
Bat_To_Exe_Converter.exe itself can be provided with a command line parameter which then is handled over as
%1. This is shown as
-productname "%1 registered" in the second part of
Picture 5. The name of the installer itself can also be determined with this
%1 parameter value. ( see parameter
-save InstallOE.%1.exe ).
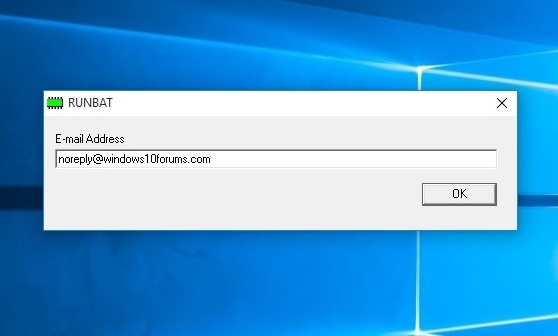
The next step was to make the whole build run again more friendly. I developed in the past a tool
RUNBAT.exe that launches a CMD file with a fixed
RUNBAT.BAT name. That
RUNBAT.exe ( see
Picture 7 ) passes the content of an editable window as parameter to RUNBAT.BAT. Within that editable RUNBAT.BAT, you can do whatever you like, which I did. I packed the
InstallOE.%1.exe into a 7-Zip
InstallOE.%1.7z compressed file, and on its turn compressed the 7-Zip file into a classic compressed file with ZIP extension. The resulting run of RUNBAT.BAT when entering "noreply@windows10forums.com" is shown within
Picture 6. The first part of
Picture 5 shows the involved binaries that all let this work, inclusive the 7-Zip specific binaries to compress the installer.
Picture 5
Picture 6
Picture 7
The do's and don'ts ....
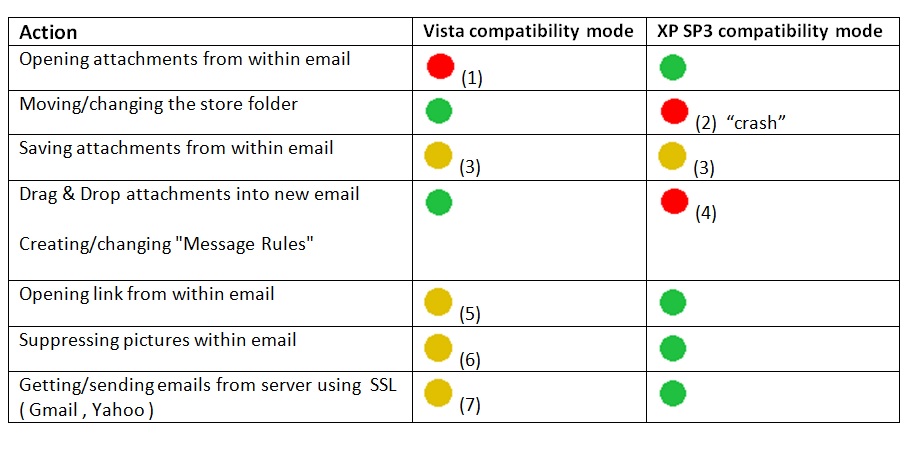
As written before, some functions work only in XP SP3 compatibility mode and others work only in Vista compatibility mode. Some work with a few "take care's". Next overview shows what I have tested. This list may not be complete , but at least , these are the functions that did show up to be more or less problematic.
Overview
(1) Opening attachments from within an email
This needs no further explanation, it just doesn't work when running in Vista compatibility mode. When you click on the attachment from an email in the right under preview pane, nothing happens. If you open the email and then click on the attachment in the "
Attach" field, the message "
The command failed to execute" pops up.
All this works fine when running in XP SP3 compatibility mode. So, it is important that an email message with *.eml extension which contains attachments and which is stored on the computer, remains associated with
msimn.exe and not with
msimncopy.exe. This way, Outlook Express in XP SP3 mode will be started when clicking on the file with *.eml extension
(2) Moving/Changing the store folder
To change the store folder, you need to navigate via "Tools" through "Options" --> "Maintenance" --> "Store Folder" --> "Change" ... Do
not try this when running in XP SP3 compatibility mode, Outlook Express will "disappear" ( crashes ). Fortunately, nothing worse happens, and you can start Outlook Express again without a problem.
Changing the Store Folder when running in Vista compatibility mode is no problem. Copying/moving the *.dbx files into a new folder or changing it to a store folder with already existing *.dbx files works perfect. Remember that a new ( empty ) Store Folder must exist on the disk when you want to move the *.dbx files, you can not create a new folder from within the selection window. After selecting a new folder or an existing store folder, Outlook Express warns you that the changes will come into effect after a restart of Outlook Express. The good news is that you may then restart Outlook Express in XP SP3 mode to let happen the move or copy run.
From XP SP3 on, Outlook Express also runs a sort of integrity check when it notices that the Store with *.dbx files has been created on another PC ( thus with another ID ) or with Outlook Express from XP SP2 , thus also created with means of the RunAsXP version. That integrity check runs as background process and may take some time depending on the amount of *.dbx files. So, do not panic when Outlook Express does not show up immediately when you access the existing Store for the first time. Just check with Task Manager how much memory and CPU time it uses. This only happens once.
(3) Saving attachments from within an email
This is rather painful ....
Attachments can be saved in two different ways :
1/ You can open the email and save the attachment within the
Attach field by clicking on the name with the right mouse button. Next, you can select
"Save as..." or
"Save All".
2/ You can save the attachments from the email when it appears in the right under preview pane after selecting
"Save Attachments..."
Only
"Save as..." works in XP SP3 compatibility mode without problems. Everything else causes problems in both XP SP3 mode and in Vista compatibility mode.
Selecting
"Save as..." in Vista compatibility mode does save the attachment, but the message
"There was an error saving ...." pops up.
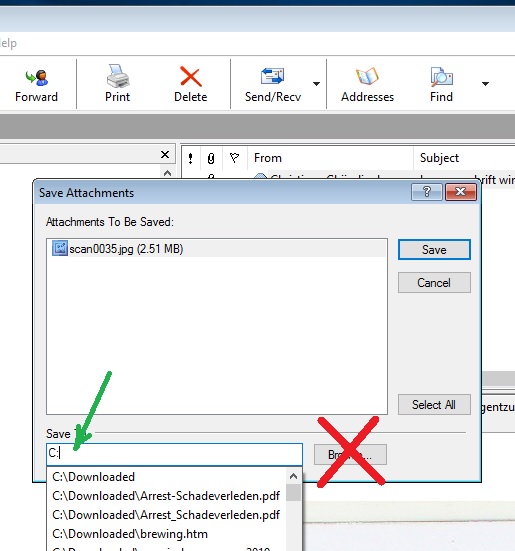
Except when using
"Save as...", the dialog box from
Picture 8 is shown. When running in XP SP3 mode, the
"Save" works without error message. When running in Vista mode, the file gets saved, but an error message
"There was an error saving ...." will be displayed.
Selecting the
"Browse... " button when running in XP SP3 mode and afterwards selecting
"Save" causes Outlook Express to hang.
You will have to "kill" Outlook Express via Task Manager. Selecting the
"Browse... " button when running in Vista mode and afterwards selecting
"Save" does save the attachment in the selected location, but again the
"There was an error saving ...." message will appear.
By this, I suggest to select the location from within the Edit control beneath the "Save to" text. You start with typing the drive letter to select a folder and you can select subfolders by adding a backslash to the selection. This works without error message in XP SP3 mode. This works in Vista mode as well, but with the error message about saving the file.
Picture 8
Users that fear to accidentally push the "Browse" button may ask for a binary ( inetres.dll ) whereby that button has been disabled.
(4) Drag & Drop attachments into a new mail -- Creating/changing "Message Rules"
When creating a new email, one can drag and drop a file into the email which will appear in the
Attach field. This works when running in Vista compatibility mode. When running in XP SP3 mode, nothing happens when dragging a file into the window. In XP SP3 mode, you will have to use the
Attach button on the toolbar with standard buttons.
Changing and/or adding entries in the
Message Rules works in Vista compatibility mode. When running in XP SP3 mode, changes are not stored.
It is also highly recommended
to change account settings running in Vista compatibility mode. Changes may not always be stored permanently when running in XP SP3 mode.
(5) Opening link from within an email
You can open links from within an email when running in XP SP3 and Vista compatibility mode. When running in Vista compatibility mode, Google Chrome pops up with some other looks and a message about not being supported anymore on Windows XP and Vista. Very strange ....
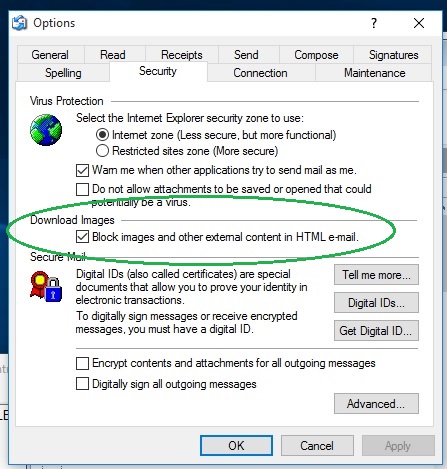
(6) Suppressing pictures within an email
This feature was introduced in XP Service Pack 2. All works perfect when running in XP SP3 compatibility mode.
However, when running in Vista compatibility mode, the ON/OFF "Block images ... " does not appear. Instead, the window from OE Service Pack 1 is displayed. The reason for this is rather hilarious. The resource of this window is stored within a resource DLL called
msoeres.dll. Now, when Microsoft made the update to SP2 , they did not update that resource within
msoeres.dll, but stored a new version of it into
xpsp2res.dll and leaving the old version unused within
msoeres.dll. ( the ways of Microsoft are inscrutable ). It's rather easy to replace the resource within
msoeres.dll with the one out of
xpsp2res.dll by means of a "resource hacker" program, which I did. The "patched"
msoeres.dll is used instead of the original one. Both patched and the original versions can be found again within the "\Hooks" folder after installation of OE. Now, setting the control ON/OFF works again in Vista compatibility mode. The Message box from
Picture 10 refuses however to pop up in Vista mode. Instead, a small bar as shown in
Picture 11 is displayed. The good news is that you can click on that bar after which the pictures will show up.
Picture 9
Picture 10

Picture 11

(7) Getting/Sending emails from/to servers using SSL ( Gmail, Yahoo )
There are in general no problems when sending or receiving mails from servers that use SSL, neither running in XP SP3 mode, nor running in Vista compatibility mode. When running in XP SP3 mode, a message box pops up with the text "
the server you are connected to is using a security certificate that could not be verified. The certificate's CN name does not match the passed value. This does not prevent you from receiving and sending mails from/to that server.
From my experience, it is not possible, when running in Vista compatibility mode, to communicate with servers that require SSL, if you mail behind a proxy or router that does Network Address Translation ( NAT ). With other words, if you need to enter IP addresses or names into the POP en SMTP fields of your account that are different from the real POP en SMTP server names, the connection returns with error number 0x800CCC0F. This problem does not happen when running in XP SP3 compatibility mode or when connecting to servers that do not require SSL.
Outlook Express gets classified by Gmail as "less secure apps". You have to turn on the "Access for less secure apps" within your Gmail account settings via the web page to be able to send and receive emails. The same applies if you want to use IMAP with Google mail ( yes, this still works ).
.
Important Update :
Google recently changed their security policy. The "Access for less secure apps" account setting has been retired and one has to use the 2-step verification method to access the Gmail servers when using older email clients. You can find at
https://www.febooti.com/products/automation-workshop/tutorials/enable-google-app-passwords-for-smtp.html
a summarized description about how to obtain a 2-step verification password for Outlook Express , or this
How to obtain new "2-step verification" passwords from Gmail and for each PC or Laptop that I provided to a happy OE user. This page contains at the bottom also the account settings to be used with Gmail servers. I recommend to change the password by running Outlook Express in Vista mode ( msimncopy.exe ).
It took an amount of time before you could request an Application password again from Yahoo. After they changed their "Security" page , it is now possible again to request a password that can be used within Outlook Express. The procedure to obtain such a password is very similar with the Google procedure. Contrary to the Gmail "2-step verification" passwords , the same Yahoo password can be used on all devices that you want to use with Outlook Express. Outlook Express settings for Yahoo are quasi identical to the Gmail settings , except for the server names.
The shortcuts ....
My installer does not create shortcuts into the Windows 10 startup tree, but it is rather easy to place them there. You only need to navigate to "
C:\ProgramData\Microsoft\Windows\Start Menu\Programs" and create there the shortcuts from "
C:\Program Files (x86)\Outlook Express\msimn.exe" and "
C:\Program Files (x86)\Outlook Express\msimncopy.exe" . The "
Programs" folder is however protected, so you must first open "Security" from within the Properties of the folder, and, which is the easiest way, "edit" the permission of "Everyone" to "Full Control". When using the drag&drop function, be sure to create a shortcut and not moving or copying the executables. You can change the text to whatever you wish instead of "Shortcut to... " and even change the icon. When doing this, the shortcuts will immediately appear in the start menu. They will appear under the capital according to the first word that you entered as text. If you change nothing, they will appear under capital "S" from "Shortcut ... ". From these shortcuts in the start menu on, you can drag and drop them onto the desktop and/or on the pane with the squares as shown on
Picture 12 . When the shortcuts are placed in "C:\ProgramData\Microsoft\Windows\Start Menu\Programs", you may reverse the "permission" on "Programs" from "Everyone" to its original setting ( = no control ). Notice however that you can explicitly create shortcuts within this "Programs" folder without changing the protection level. You then need to manually fill the links to the
msimn.exe and
msimncopy.exe executables within the shortcut. The foldernames "
Start Menu" and "
Programs" may become translated depending on the Windows 10 language version, but this may not cause a problem, I presume
Picture 12
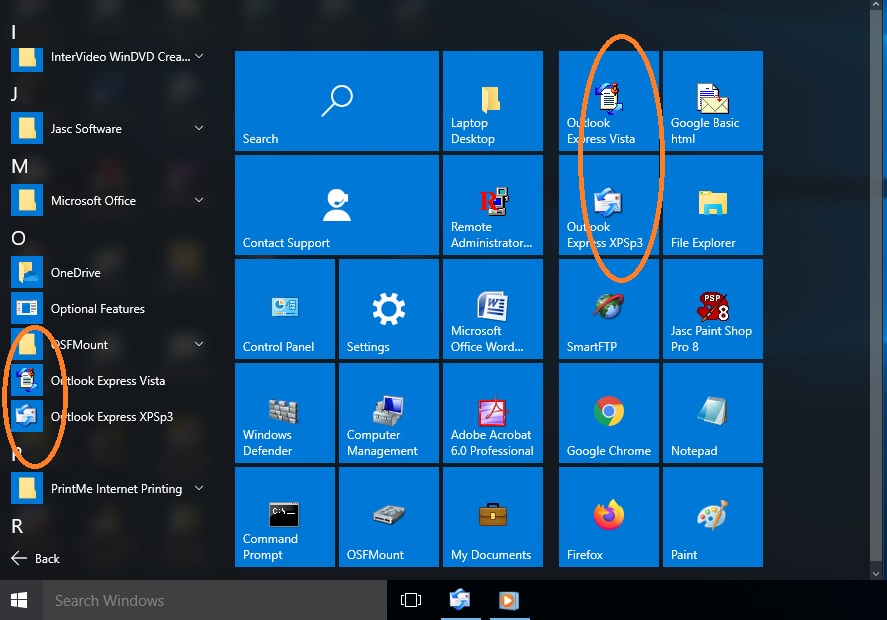
Actually , the installer will create shortcuts into the "C:\ProgramData\Microsoft\Windows\Start Menu\Programs" folder as shown at the left side of Picture 12 above. It will also create the same shortcuts on the Desktop ( "C:\Users\%username%\Desktop" ). You may delete them if unwished.
Hints, tips and trivia ....
(1)
As user who obtained my installer, you do not need to worry about how the installer was built. You only need to know what is written within the "Introduction" , "The do's and don'ts ...." and "The shortcuts ...." . I also suggest to expand the *.exe installer out of the 7-Zip file into an empty C:\Temp folder and run the installer "as administrator" from that location. This way, you will see the expanded files during the installation and the installer itself will not get into trouble with long directory names.
(2)
Starting from XP SP3 , Outlook Express makes a copy of a *.dbx file before starting to compress that *.dbx file. The copy becomes the *.bak extension, and when the compression succeeds, that *.bak file is deleted ( moved into Recycle Bin ). The compression works slower, but the benefits are worth to wait longer for it. When the compression ends, one can look in the Store Folder for these *.bak files and check with, for example "MailView.exe", what is wrong with them. The compression runs at "normal priority" , but it takes so much CPU time and memory that other applications may become unresponsive. When this happens, it is a good idea to change the running priority to "below normal" via Task Manager ( click with the right mouse button on the displayed process name --> "Go to details" --> click again with the right mouse button on the displayed process name--> "Set Priority" --> select "Below normal" )
(3)
Outlook Express does not allow you to select a network drive as Store Folder. However, if you "patch" its "Store Root" in the Registry with a network drive letter plus folder name, it does not complain about it.
Assume that the store folder is placed in "C:\My Documents\Outlook Express" on Computer A and "C:\My Documents" is shared on the network as "My Documents".
On computer B , map drive letter "O" to "\\Computer A\My Documents", thus the Outlook Express store folder with its *.dbx files from Computer A will be visible on Computer B as "O:\Outlook Express". It is now just a matter of patching "O:\Outlook Express" into the Outlook Express "Store Root" registry entry on Computer B.
This "Store Root" registry entry can be found at [HKEY_CURRENT_USER\Identities\{xxxxxxxx-xxxx-xxxx-xxxx-xxxxxxxxxxxxx}\Software\Microsoft\Outlook Express\5.0].
Example :
[HKEY_CURRENT_USER\Identities\{A257323D-291B-4729-B29B-5A17F6CCCDB0}\Software\Microsoft\Outlook Express\5.0]
"Store Root"="O:\\Outlook Express"
When I tried this out, I noticed that the network link was not stable accessible to Outlook Express after turning on Computer B. If Outlook Express cannot access the network, it immediately returns with an error message, but worse, it restores the "Store Root" entry to its default value. To be sure that this does not happen again and again, I saved the registry patch above as "StoreRoot.reg" and placed a "msimn.cmd" command file into the program folder that calls "msimn.exe" :
regedit /s "C:\Program Files (x86)\Outlook Express\StoreRoot.reg" ( full path required on Windows 10 when running from within a *.cmd file )
net use O: "\\Computer A\My Documents" /PERSISTENT:YES
call msimn.exe
The "net use" command forces the network link to be established immediately.
It should be clear that you may not run Outlook Express on both computers at the same time. The "Folder.dbx" may get damaged resulting in an inaccessible "Inbox", and it is a hard job to restore the problem.
As written before, from XP SP3 on Outlook Express also runs a sort of integrity check when it notices that the Store with *.dbx files has been accessed through an older version of Outlook Express - and even now when the Store was accessed by Outlook Express on another PC. That integrity check will run as background process every time that the Store was accessed on another computer using Outlook Express. You can prevent this by exporting the HKEY_CURRENT_USER\Identities and HKEY_CURRENT_USER\SOFTWARE\Microsoft\Internet Account Manager ( see (5) below ) and importing these keys with means of the Registry Editor on the other computer. Be sure however to delete these keys on the other computer before importing the ones of the first computer from where you saved the keys. Do not forget to adapt the "Store Root"="O:\\Outlook Express" mentioned above on the approriate computer.
I also recommend to suppress compacting the *.dbx folders on the computer that accesses the Store from the other computer via the network . That compacting is triggered after Outlook Express has been started after 100 times. You can suppress the *.dbx compacting by resetting the "Compact Check Count" key value to a value below 100.
Example
[HKEY_CURRENT_USER\Identities\{A257323D-291B-4729-B29B-5A17F6CCCDB0}\Software\Microsoft\Outlook Express\5.0]
"Compact Check Count"=dword:00000001
You may add this into the "StoreRoot.reg" mentioned above.
(4)
When starting Outlook Express in XP SP3 mode, the annoying UAC message will appear with the question if you will allow the program to make changes to your PC. You can change this behavior by changing the "ConsentPromptBehaviorAdmin" setting. See https://docs.microsoft.com/en-us/windows/security/identity-protection/user-account-control/user-account-control-group-policy-and-registry-key-settings. Please have in mind that suppressing the UAC message will suppress the prompt for all programs, and thus not only for Outlook Express running in XP SP3 mode. The UAC message does not pop up when running in Vista mode.
Summarized :
Changing the "ConsentPromptBehaviorAdmin" key value from 5 to 0 will suppress the UAC message.
The key value can be found at "[HKEY_LOCAL_MACHINE\SOFTWARE\Microsoft\Windows\CurrentVersion\Policies\System]"
If you like to change the UAC behavior using the Registry Key, but are not familiar with the Registry editor, you may download ConsentPromptBehaviorAdmin.7z . This 7-Zip compressed file contains ConsentPromptBehaviorAdmin_0.reg which turns the popup of the UAC message off, and ConsentPromptBehaviorAdmin_5.reg which turns it back on.
(5)
Next pictures show how to save HKEY_CURRENT_USER\Identities and HKEY_CURRENT_USER\SOFTWARE\Microsoft\Internet Account Manager. Click with the right mouse button on the key, select "Export" and a new window will ask for a name and location for the *.reg file.
On Windows XP and Windows 8/8.1 , these Registry hives are present as well at the same location. By this , you can export them and import them on Windows 10/11. Be sure however to rename the existing "Main Identity" on Windows 10/11 into for example "My Identity" before importing the key values. You can not export and import compatible keys from Windows 7 , those are located differently.
(6)
If you want to change the layout of Outlook Express into another language, you will have to search and collect following files from the hard disk of an existing Windows XP installation with Service Pack 3 :
ACCTRES.DLL
MSOERES.DLL
WAB32RES.DLL
XPSP2RES.DLL
INETRES.DLL
MAPI32.DLL
MAPISTUB.DLL
OEMIGLIB.DLL
MSIMN.EXE
First, you need to replace the files within C:\Program Files (x86)\Outlook Express with the collected binaries, as well as "msimncopy.exe" with the collected "msimn.exe". The next step is copying C:\Program Files (x86)\Outlook Express\Hooks\msoert2.dll 'oehook.dll' inserted\msoert2.SP3.hooked.dll into C:\Program Files (x86)\Outlook Express. Then delete C:\Program Files (x86)\Outlook Express\msoert2.dll and rename msoert2.SP3.hooked.dll within C:\Program Files (x86)\Outlook Express into msoert2.dll.
Unfortunately, the "Block images ... " control as shown in Picture 9 will not appear when running in Vista compatibility mode. If you want this control to appear again, you will have to provide me with the collected MSOERES.DLL and XPSP2RES.DLL binaries. I may then be able to replace the dialog within MSOERES.DLL with the correct one out of XPSP2RES.DLL and return this "patched" MSOERES.DLL back.
I am now able to provide Overlay installation packages for several other languages by means of the Windows XP Multilingual User Interface Pack. Follow packages are currently available :
OE.Overlay.French.exe.7z
OE.Overlay.Dutch.exe.7z
OE.Overlay.Hebrew.exe.7z
OE.Overlay.Spanish.exe.7z
The installation is very straightforward. Open de compressed 7-Zip package and copy the OE.Overlay.xxxxxx.exe self-extracting compressed *.exe file into C:\Program Files (x86)\Outlook Express. Close Outlook Express if it was running. Run the OE.Overlay.xxxxxx.exe As Administrator. The selfextracting compressed will show C:\Program Files (x86)\Outlook Express as location where to expand the files. Select "Extract" and acknowledge to replace ALL binaries. Outlook Express is now ready to run in the new language version. There is no need to care about msoert2.SP3.hooked.dll and MSOERES.DLL, all necessary patches and hooks are already provided.
You can still fall back to the English language version by using and installing the OE.Overlay.English.exe language version.
I may give support and provide other language versions of these packages if you don't have the XP OS version available. I may provide an installer that installs Outlook Express directly into another language as well, thus without using an Overlay language package. .
There is however one big problem with Windows versions that use multibyte / unicode languages ( Hebrew , Russian , Arabic , etc ... ). Outlook Express is a non-unicode program and some texts will be displayed as ???????? . To solve this problem , you must change a region setting. This is clearly demonstrated within this How to Fix Language Problem of Non Unicode Program in Windows 10 - Simple Fix video.
(7)
An interesting but outdated site about Outlook Express ( last updated on 28 May 2006 ) : https://insideoe.com/sitemap.htm (*)
SpamBrave for Outlook Express : A spam filtering plug-in for Outlook Express : https://download.cnet.com/SpamBrave-for-Outlook-Express/3000-2382_4-10439158.html. Install and use it at your own risk.
(*) The site is not available anymore. Users that are interested to want it back , may ask for a off-line web version captured from "Archive.org".
(8)
It is possible to get almost all language spelling checks running within Outlook Express. You should use an older version of the Microsoft Proofing Tools, for example "Office 2007 Proofing Tools (x86)" and install this. It does not matter if you install it before or after Outlook Express is installed. During installation, you have to select "Custom installation" and then you can select the languages you want to use within Outlook Express. The installation does not ask for an installation key or activation, but requires that at least one component of Office 2007 ( Word , Excel , or whatever ) or Visio 2007 is installed. After installing the Proofing Tools, you may uninstall Office 2007 and/or Visio, the Proofing Tools will remain working. The Microsoft Proofing Tools installs also a bunch of fonts that all become accessible from within Outlook Express.
I did download the Office 2007 Proofing Tools from here : https://ia802907.us.archive.org/9/items/microsoftofficeproofingtools2007/en_office_2007_proofing_tools_x86_dvd_x12-70398.iso
There is one little problem. Even when "English" is selected during installation of the Tools, this language does not appear when trying to select the "Language" via "Options" --> "Spelling". Also, when clicking on "Edit custom directory" , nothing happens. Both problems can be solved by installing "spell.exe" from here : https://www.majorgeeks.com/files/details/spell_checker_for_oe.html. Pay attention however to select "C:\Program Files (x86)\Outlook Express" as installation folder. This way, it will not interfere with the files and settings from the Microsoft Proofing Tools. Or you may download my OEProofingToolsEnglish.7z , expand the four files into "C:\Program Files (x86)\Outlook Express" and double click on "Proofing Tools.reg" to register the *.dll and the *.lex file.
New users do receive my OE6 installer where my OEProofingToolsEnglish will be installed and activated, thus without the need afterwards to download and install the English Spell checker.
(9)
It is possible to implement the "Send to" function from within Explorer in the same manner as is it was implemented within RunAsXp. The "SendToVB.exe" program from https://itmanagerslife.blogspot.com/2011/12/send-attachment-with-default-email.html makes this possible. That tool is based on the source code from https://www.codeproject.com/Articles/17561/Programmatically-adding-attachments-to-emails-in-C# and https://www.codeproject.com/Articles/15361/Split-Function-that-Supports-Text-Qualifiers. To start up Outlook Express from "SendToVB.exe", the program must be "detours hooked" as well.
You can download the program and a command file to launch it here : SendToOE.7z . Expand the three files into "C:\Program Files (x86)\Outlook Express". Afterwards , copy or move the "Send To Outlook Express" shortcut ( "Send To Outlook Express.lnk" ) into C:\Users\[your windows login user name]\AppData\Roaming\Microsoft\Windows\SendTo folder.
This may not work if Microsoft Office Outlook is installed.
(10) How to protect your OE installation against removal and how to restore it ( Summary )
What to save ....
a) Save the registry settings as explained above at (5).
b) Export the AddressBook and save the resulting *.WAB file into a safe location.
c) Copy all files from C:\Program Files (x86)\Outlook Express into a safe location and/or compress them into a ZIP compressed file. This is very important for users who updated to another language as described within (6) and added the spelling check support described within (8) above.
d) Locate the Store with *.dbx files and copy the folder to a safe location.
How to restore ....
If you accidentallly started Outlook Express , you need to delete the "Identities" and "Internet Account Manager" registry entries shown above at (5) before you proceed.
e) Enter the previously saved registry keys from a). Enter the "Proofing Tools.reg" key if you added the spelling support.
f) Copy the saved Store folder with its *.dbx files to the location found at step d) if the Store was removed from that location.
g) Reinstall Outlook Express using my installer.
h) Replace all newly installed files from C:\Program Files (x86)\Outlook Express with the ones you saved within step c) above.
i) Reenter the shortcuts if they were removed. See "The shortcuts .... " explanation on this web page above.
j) Import the saved AddressBook from step b).
k) Eventually "change" the Store Folder to the location found in step d) if it was changed due to a Microsoft update/upgrade. See The do's and don'ts .... topic (2) Moving/Changing the store folder.
Done !
Contact:WinRamTech@GMail.com